The Express Form Documentation contains detailed information on how to customize the display of an Express Form – but without some guidance, this documentation might be a bit overwhelming. In this tutorial, we'll cover how to do something simple: modify the display of an Express form's required form elements.

This is a screenshot of the contact form in a standard 8.2 install. Here, the required form elements are displayed as labels to the right of the label. Let's change their classes and placement.
Custom Templates
Good news! We won't have to modify any block custom templates. We will have to touch code, but our code will affect all Express Forms used in our theme on the front-end of the website.
Create a Custom Front-end Form Context
First, we're going to create a new PHP class file named FrontendFormContext.php for our site's custom front-end form context. This will allow us to choose a new location to load form template files from in our site.
<?php

namespace MySite\Express\Form\Context;

use Concrete\Core\Express\Form\Context\FrontendFormContext as CoreFrontendFormContext;

class FrontendFormContext extends CoreFrontendFormContext
{

public function getAttributeContext()
{
    return new \MySite\Attribute\Context\FrontendFormContext();
}

}
Place this file in application/src/MySite/Express/Form/Context, creating the directories if necessary.
What is this file doing? Simply put, it's creating a class that represents a custom front-end form context. Contexts represent how we're viewing a particular form. Learn more here. This class tells an Express Form where to load its templates from. It is also responsible for delivering a context object that tells the attributes within that form where to load their templates from – and that's what we care about. So we implement the getAttributeContext object in our custom context, and pass a custom attribute context object to it.
Custom Attribute Context
Much like the custom Express context above, the custom attribute context is responsible for telling Concrete where to load forms related to a particular attribute context. Whenever a form uses our custom Express context above, it is now telling Concrete to use this custom attribute context when loading forms. Let's implement that custom attribute context.
Create the new PHP file named FrontendFormContext.php in src/MySite/Attribute/Context/ and place the following code in it:
<?php
namespace MySite\Attribute\Context;

use Concrete\Core\Attribute\Context\FrontendFormContext as BaseFrontendFormContext;
use Concrete\Core\Filesystem\TemplateLocator;

class FrontendFormContext extends BaseFrontendFormContext
{

    public function setLocation(TemplateLocator $locator)
    {
        $locator->setTemplate('frontend');
        return $locator;
    }

}
What's this doing? By overriding the setLocation() method in our context, we're telling Concrete that whenever it loads an attribute using this custom attribute context, we want to load the template for the forms from a file named frontend.php.
Copy the Core Template files into the Custom Location
Now, let's copy the existing wrapper template files into the new frontend.php file we're specifying here. Copy concrete/elements/form/bootstrap3.php to application/elements/form/frontend.php.
Edit the Template
The existing bootstrap3 template for attributes looks like this:
<?php
defined('C5_EXECUTE') or die('Access Denied.');
?>

<div class="form-group">
    <?php if ($view->supportsLabel()) { ?>
        <label class="control-label"><?=$view->getLabel()?></label>
    <?php } ?>

    <?php if ($view->isRequired()) { ?>
        <span class="text-muted small"><?=t('Required')?></span>
    <?php } ?>

    <?php $view->renderControl()?>
</div>
Edit frontend.php and change that code into this:
<?php
defined('C5_EXECUTE') or die('Access Denied.');
?>

<div class="form-group">
    <?php if ($view->supportsLabel()) { ?>
        <label class="control-label"><?=$view->getLabel()?></label>
    <?php } ?>

    <?php if ($view->isRequired()) { ?>
        <span class="label label-info"><?=t('Required')?></span>
    <?php } ?>

    <?php $view->renderControl()?>
</div>
All we're changing is the text-muted class to label.
Create a Custom Form Controller
Now, let's create a custom Form Controller that maps the front-end form context to this custom class. Create the file FormController.php in application/src/MySite/Express/Controller/.
<?php

namespace MySite\Express\Controller;
use Concrete\Core\Express\Controller\StandardController;
use Concrete\Core\Express\Form\Context\FrontendFormContext as CoreFrontendFormContext;
use MySite\Express\Form\Context\FrontendFormContext;

use Concrete\Core\Form\Context\Registry\ContextRegistry;

class FormController extends StandardController
{


    public function getContextRegistry()
    {
        return new ContextRegistry([
            CoreFrontendFormContext::class => new FrontendFormContext()
        ]);
    }
}
This class makes it so that any Express Form that uses this controller will substitute our custom front-end form context object any time the core front-end form context is used.
Enable Auto-Loading and the Custom Controller
Finally, we need to tell Concrete where to find our MySite* classes, and that we want to use our custom form controller for all Express Forms in the site. Add this to application/bootstrap/app.php.
$strictLoader = new \Concrete\Core\Foundation\Psr4ClassLoader();
$strictLoader->addPrefix('\MySite', DIR_APPLICATION . '/src/MySite');
$strictLoader->register();

$app->make('Concrete\Core\Express\Controller\Manager')
    ->setStandardController(\MySite\Express\Controller\FormController::class);
The first three lines here tell Concrete where to find all classes in the namespace MySite\* – application/src/MySite.
Next, we use the Express Controller Manager to set the default form controller to our custom controller.
Results
We're done. Our form now looks like this:
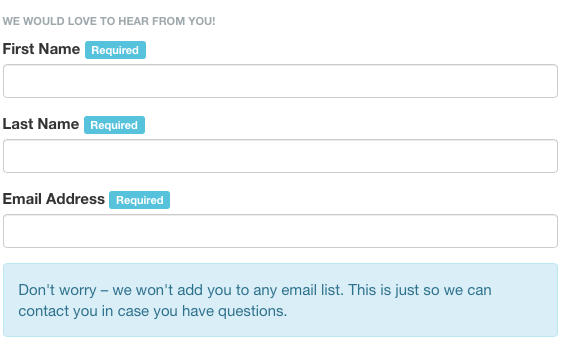
More complex than editing a custom template, but this approach actually lets you customize every aspect of an attribute and Express control without worrying about whether the templates will break when included in the Dashboard or other views.
Conclusion and List of Files
By the end of this, you should have the following files in your site:
application/boostrap/app.php- This file is responsible for registering the
MySite\*namespace, and registering your custom Express Form controller as the default controller for every Express form. application/src/MySite/Express/Controller/FormController- This is your custom Express Form controller. It maps the front-end form context to your custom implementation, ensuring that your custom rendering object will only be used when rendering forms on the front-end of the website.
application/src/Express/Form/Context/FrontendFormContext- This is your custom front-end form context object. It simply extends the standard context object, but utilizes a custom context for attribute forms.
application/src/MySite/Attribute/Context/FrontendFormContext- This is your custom attribute context that overrides the standard bootstrap3 attribute form wrapper template with a custom frontend.php template. This template will be automatically loaded from
application/elements/form/frontend.php. application/elements/form/frontend.php- This template is responsible for displaying a customized form control wrapper for the attributes in your Express forms.
Working with Packages
This example uses application-level overrides, but all these overrides can be accomplished by using packages as well. You'll just need to use the package's on_start() method instead of the application/bootstrap/app.php file, and you'll have to use package autoloading to load the class locations, and you'll have to pass your package handle to the setTemplate methods when used.