Limit editors to a specific section of your site
Goal
How to set up a group of users so that they can edit a page set up by an admin and then create, publish and edit new pages below that first page. In the end, users in this group will
- edit a particular page (call it X) and publish their changes.
- create and publish subpages of X and
- edit any of these subpages and publish the changes.
In this example, we will set up a section of a site for blog entries. Any users in the Blog Authors group can add and edit new blog entries in this section, but not change any other part of the site. We will use the basic Elemental theme install with the sample content to illustrate this process which means that you can follow along by creating a free SimpleSite trial to test out these steps with a clean install.
Steps to Implement
Set Up a User Group and Add Users to It
Create a user group to contain the blog authors. In this case, we'll call it Blog Authors:
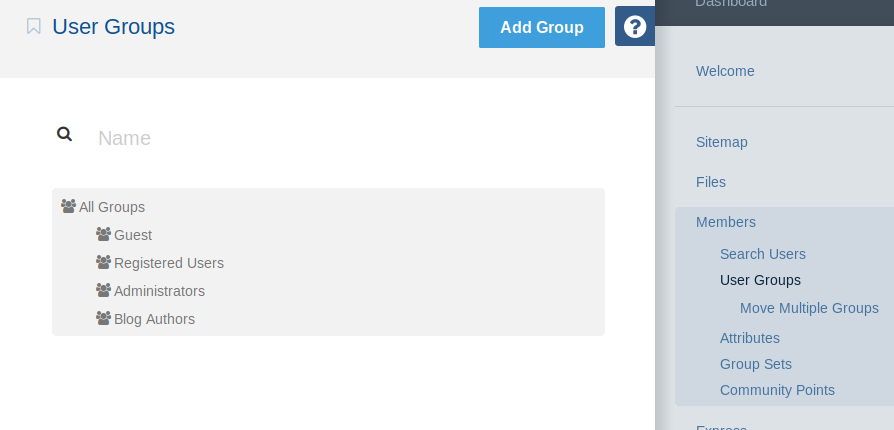
There's nothing special about this group; we just need a way to group users to simplify the permissions we are going to add, so don't change any defaults. Then add the blog authors to the group. In the example below, we have an example user with the username blog_author who has been added to this group:
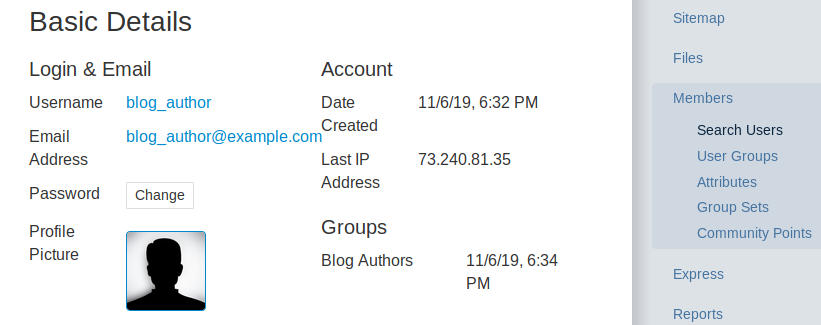
we can add users to the Blog Authors group when the user is created by selecting that group in the Groups section, or we can add existing users to the group by clicking the Add Group button from the user view page.
Enable Advanced Permissions
In order to accomplish our goal, we will need to enable advanced permissions. This will allow very fine-grained control over who can do what and where. Enable advanced permissions in the dashboard in System & Settings > Permissions & Access > Advanced Permissions by clicking on the Enable Advanced Permissions button at the bottom. This can not be undone; enabling advanced permissions is a one-way road.
Now that advanced permissions are enabled, there are a few different types of permissions which need to be changed.
Set Task Permissions
The Access Sitemap task permission will allow users in the Blog Authors group to view the pages under the blog page. This may not be necessary if these users don't need the option to move pages around underneath the blog page.
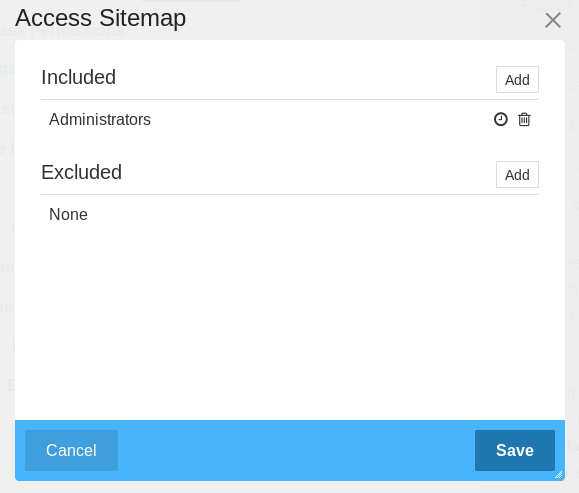
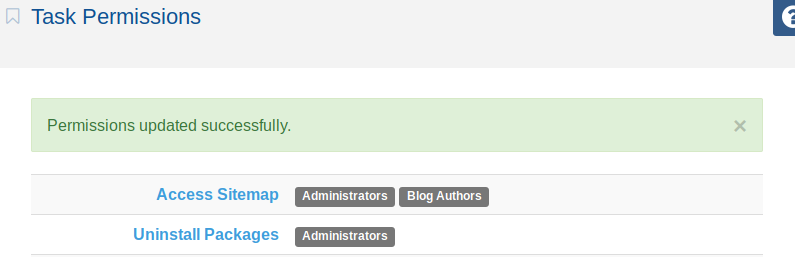
Go to System & Settings > Permissions & Access > Task Permissions and click Access Sitemap. Click the Add button in the Included section of the modal window.
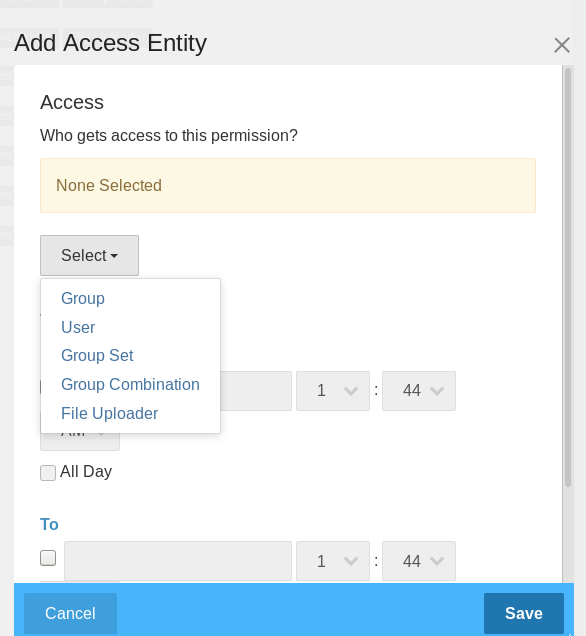
From the Add Access Entity modal window, select Group from the Select dropdown menu.
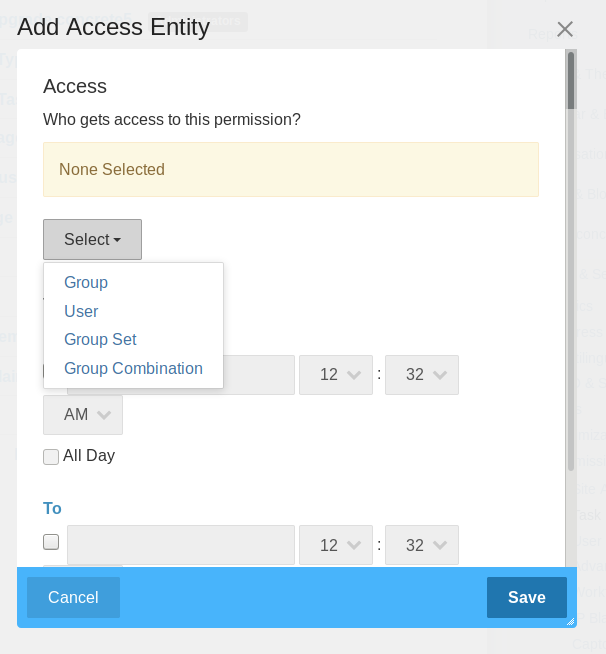
Then select the Blog Authors group from the Add Group modal.

Save the Add Access Entity modal window, and then save the Access Sitemap modal window. This will take us back to the Task Permissions list, but don't forget to click Save at the bottom of the screen! The changes will not be changed until we do so.
Set Sitemap Permissions
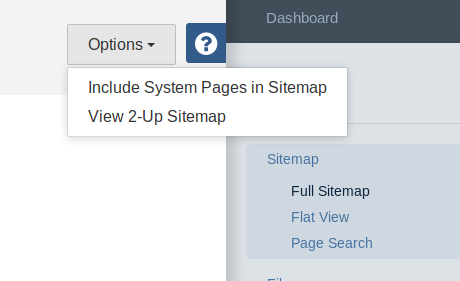
Even if we don't want users to access the sitemap, we still need to set some permissions on the sitemap. First, set permissions on the Drafts page. This is hidden by default since it's a system page. To find it, go to Sitemap and select Include System Pages in Sitemap from the Options dropdown menu.
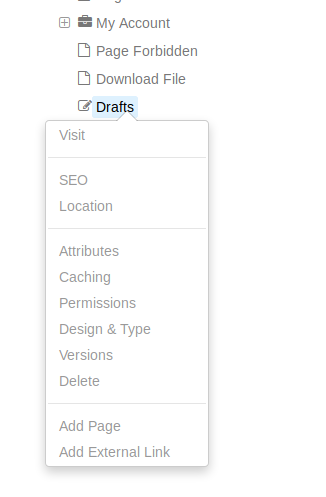
After the sitemap reloads with the system pages displayed, select the Drafts page and then select Permissions from the contextual menu.
In the Permissions modal window, we will set some of the permissions to include the Blog Authors group.
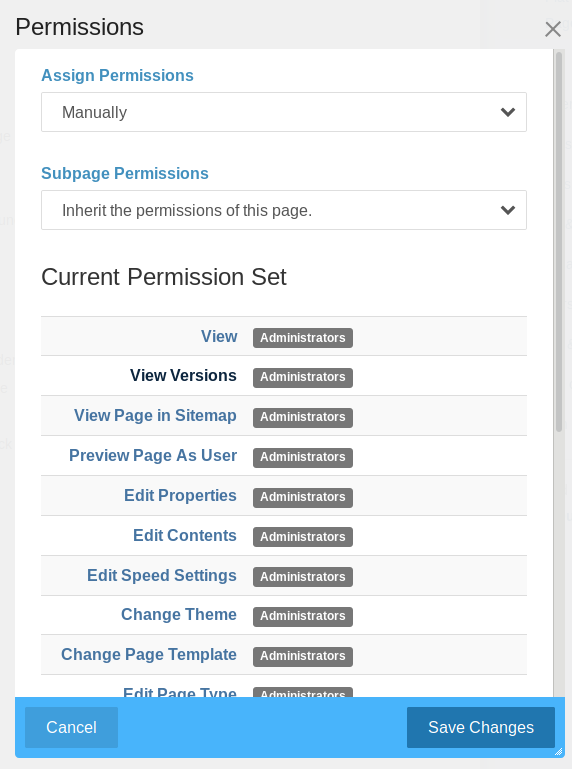
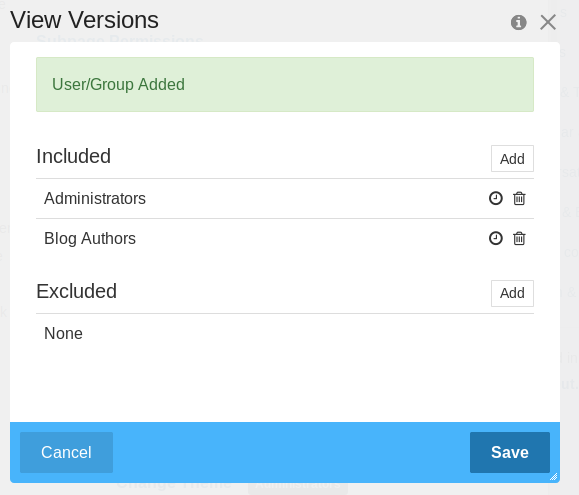
First click on View Versions permission to activate the View Versions modal window. This window looks very similar to the one we saw when adding Access Sitemap task permissions. We're going to follow the same steps to add the Blog Authors group and then click the Save button.
We need to add the Blog Authors group to most of the permissions in this set, which could require a lot of clicks. Fortunately, there's a shortcut we can use to duplicate the settings from one permission to others. Hover the cursor over one of the entries for the View Versions permission and it will change to include a small plus sign (+).
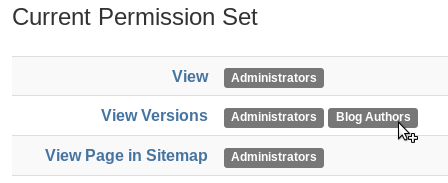
We can then click and drag the entries from the View Versions permission (we'll call them the permission signature) and drop them on the View Page in Sitemap permission. The background of the View Page in Sitemap permission will change to indicate where the permission signature will be applied.
The permissions needed will depend on each unique situation, but in this example, let's add the Blog Authors group to the following permissions:
- View Versions
- Preview Page As User
- Edit Properties
- Edit Contents
- Change Page Template
- Edit Page Type
- Delete
- Delete Versions
- Approve Changes
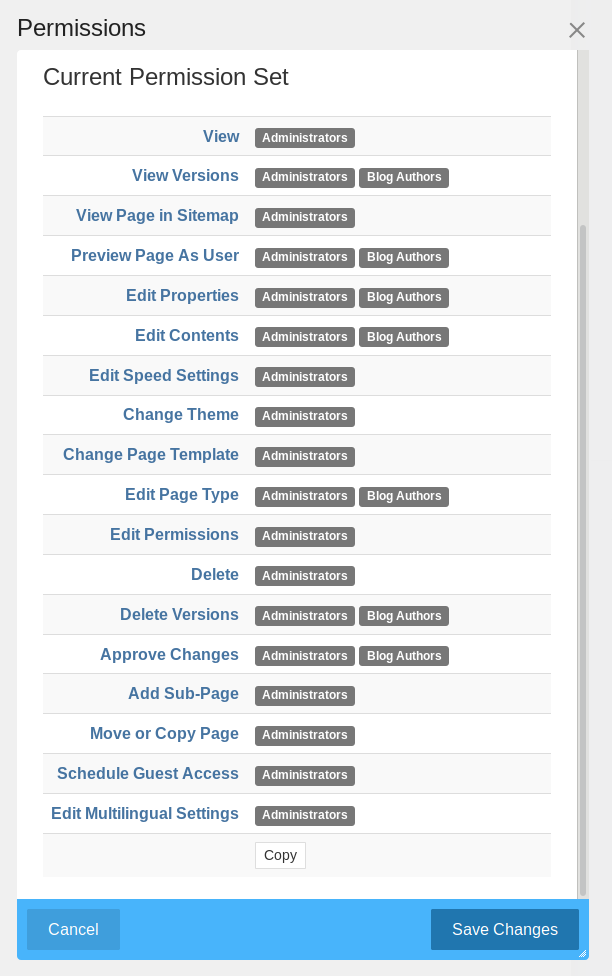
Before saving, click on the Copy button at the bottom of the list. This is another shortcut which will allow us to apply the same permission signatures to another page! Finally, click Save to apply these permissions to the Drafts page.
The permissions on the Drafts page are required for publishing from the Composer interface because it creates drafts automatically when it periodically auto-saves.
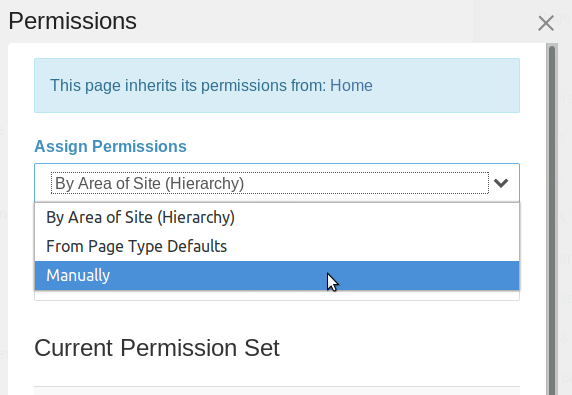
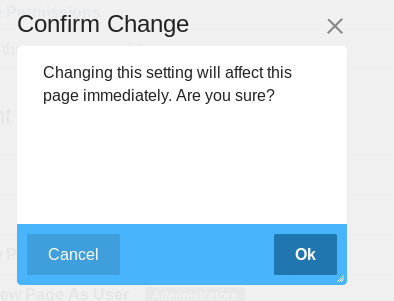
To allow users in the Blog Authors group to create new blog entries, we need to apply the permission signatures we just copied to the Blog page. Click on the Blog in the sitemap and then Permissions from the contextual menu. By default, pages inherit permissions from their parent, but we want to make this section different to the rest of the site. So the first thing is to change Assign Permissions to Manually.
Choose Ok from the confirmation modal window.
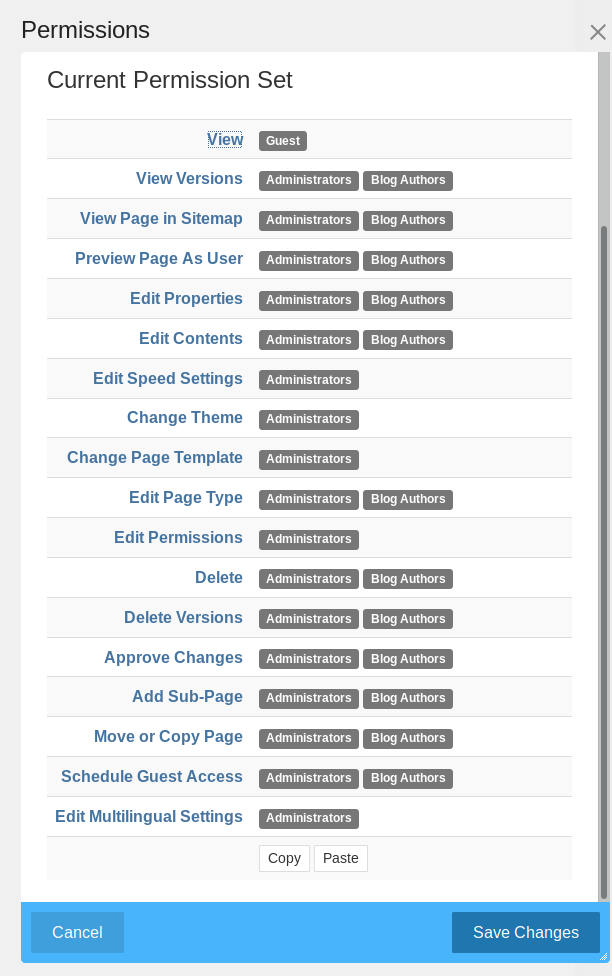
Now we can apply the permission signatures which we copied from the Drafts page. Just scroll to the bottom of the list, click the Paste button. That applies the same permission signatures, but we still need to change a few. Change View permissions back to Guest (an automatically created user group) by deleting Administrators (click on the trash icon) and add Guest. Then copy a permission signature with both Administrators and Blog Authors to:
- View Page in Sitemap
- Delete
- Add Sub-Page
- Move or Copy Page
- Schedule Guest Access
Then click Save Changes.
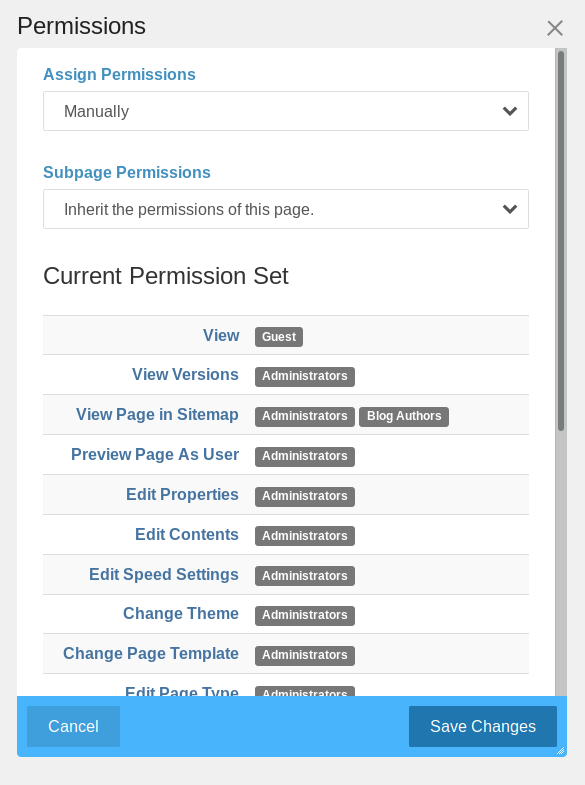
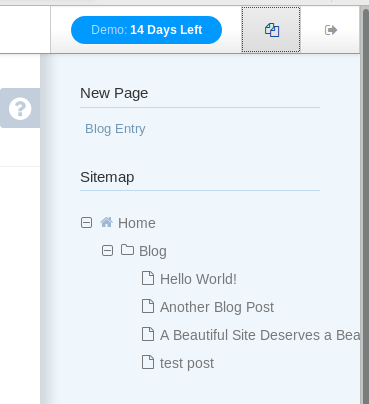
We still need to consider the permissions of the Home page since the Blog page is under it. If we don't allow the users in the Blog Authors group to view the Home page in the sitemap, then they won't be able to see the Blog page either. One possible issue is that all of the other pages inherit permissions from the Home page as well. If we don't want users in the Blog Authors group to see those pages at all in the sitemap, then we'll need to change permissions on those pages as well.
Let's start by changing the way permissions are assigned from By Area of Site (Hiearchy) to Manually (and confirming this change as well) for all of the pages at the first level under the Home page. This disconnects them from the Home page so that we can make a single change on it without affecting all of the other pages. Now, all we need to do is add the Blog Authors group to the View Page in Sitemap permission and then click Save Changes.
Now with this setting, a user in the Blog Authors group will only be able to see the Blog page under the Home page (after setting the rest of the permissions in the following sections, of course):
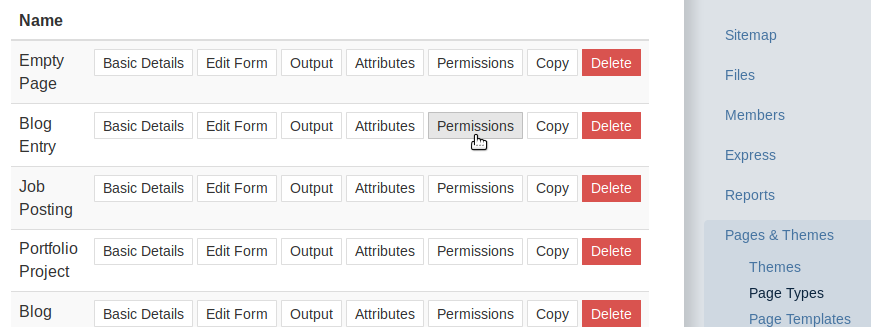
Set Page Type Permissions
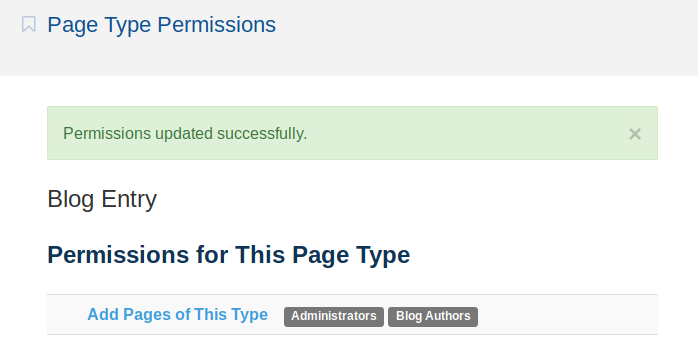
Now we need to give the Blog Authors users permission to access the page types they can use to make new pages. In this case, we will give them permission to the Blog Entry page type. In the Dashboard, go to Pages & Themes > Page Types and click on the Permissions button for the Blog Entry page type.
All that needs to be changed is the Add Pages of This Type permission. Add the Blog Authors group and don't forget to click Save at the bottom of the page to apply the changes.
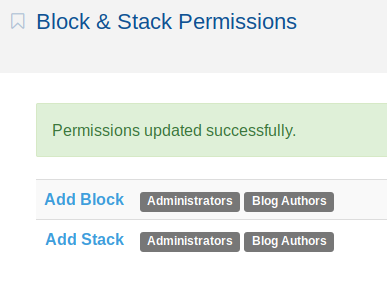
Set Block and Stack Permissions
In the Dashboard, got to Stacks & Blocks > Block & Stack Permissions and add Blog Authors to both Add Block and Add Stack permissions. Don't forget to click Save at the bottom of the page.
Set File Manager Permissions
If blog authors will be adding or using any images, they will need access to the file manager. In the Dashboard, go to System & Settings > Files > File Manager Permissions. We can use the same drag-and-drop trick here to add the Blog Authors group to several permissions. We're going to allow them to search existing files and add files to the file manager, so add Blog Authors to one of the following and then click and drag to the others in this list:
- Search File Folder
- Edit File Folder
- Copy File
- Add File
We want other users in the Blog Authors group to use images uploaded by other users in the same group, but we want to give some special permissions to the user who uploaded the file in the first place so that other users don't mess things up. There are some automatically created groups that can help here. In this case, it's the File Uploader group. When we add a group to one of the permissions, the special File Uploader group will appear in the Select dropdown menu of the Add Access Entity modal window:
Add File Uploader to the following permissions:
- Edit File Properties
- Edit File Contents
- Delete File
Don't forget to click the Save button at the bottom of the page to apply the permissions changes.
Conclusion
As we can see, advanced permissions are very fine-grained. This means that it's very powerful and flexible for a wide range of use cases, but also easy to mess up. The above example may not fit your needs perfectly, but should be enough to illustrate all the different types of permissions that need to be considered when enabling advanced permissions.